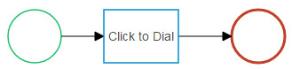
Request a Call
The Click to Dial flow notation can be used to enable customer requested outbound calls. An interaction can be created with an API call to CxEngage that places an outbound call work offer into a queue that you identify in your flow configuration.
To use this feature, you must have a method available for customers to submit their request. For example, a web form from your website that makes a call to the CxEngage API to create an outbound interaction. The customer request needs to include the telephone number that they want to be called at, entered in E.164 format.
Single Queue
If you only have one queue for customer requested calls, you can use a standard Click to Dial flow design and a dispatch mapping with an outbound direction. Specify the queue that you want the call request to be sent to in the Default Queue parameter of the Click to Dial flow notation.
- If you have an existing Click to Dial flow that is used on your tenant for other features such as using the dial pad, you can use that existing flow by updating the Default Queue parameter with the queue that you want outbound call requests to be sent to.
- If you have an existing Click to Dial dispatch mapping, you can use it for call requests as well.
See Click to Dial in the Flow Designer Reference for information on configuring the parameters and bindings.
Multiple Queues
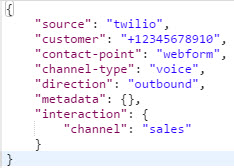
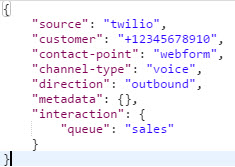
Your flow can be configured to send call requests to different queues based on conditions. For example, you may have a web form that includes an option for customers to select a topic for their request such as sales or support. That data is included in the created interaction details and can be used within the flow routing.
There are a few different options for your flow configuration.
Multiple Queues Using Click to Dial Notations
You can design your flow using multiple Click to Dial notations following a decision branch, where each branch is configured for a queue. To configure your flow in this way, the interaction parameter of the POST request sent to CxEngage should include an attribute to identify the channel selection.
Your flow design for this method should include a decision branch and paths for each of the queues available to their applicable Click to Dial notation.
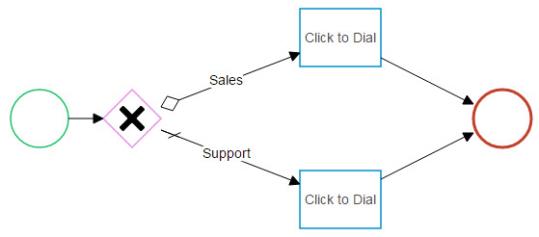
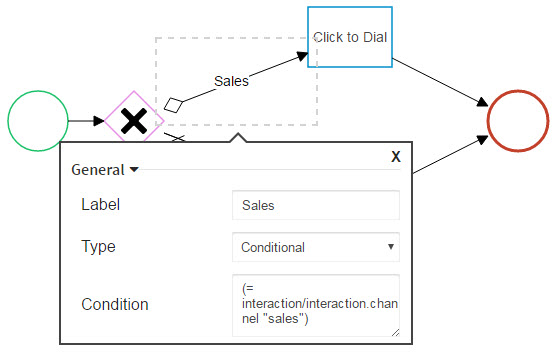
In this example, we have a conditional branch stating (= interaction/interaction.channel "sales") which means that if the customer selected the sales channel on your webform, their request is sent to the Sales queue. The Support branch is a default branch, meaning any channel selection other than sales routes to the Support queue.
Multiple Queues Using Reusable Flow
You can create a reusable flow specifically to request a call that will allow you to use an input variable for a default queue instead of identifying a specific one. That reusable flow is then used as a notation within your flow for call requests.
To configure your flow in this way, the interaction parameter of the POST request sent to CxEngage should include an attribute to identify the queue string selection.
For this type of feature configuration, you'll need to create two flows - a reusable flow and a customer flow.
First, create your reusable flow that will let you turn the Default Queue into a variable.
- Create a new flow, selecting Reusable as the type. The flow name should be something easily identifiable to you, such as Request a Call.
- Access the Flow Settings (
 ) and go to the Flow Inputs tab.
 - Add a new Input by clicking the + symbol.
- Label: The user-friendly display name for this variable field, such as Queue ID
- Variable: The variable name, such as queue-id
- Type: Expression
- Default: Not required
- Required: Leave disabled
- Condition: Not required
- Click Close
- Return to your flow designer canvas and design your flow using only Entry, Click to Dial, and Exit notations.
- Configure your Click to Dial notation parameters. Leave the Variable toggle disabled for all the parameters, except for Default Queue - this parameter should become a variable. Enter the variable label that was created in Step 4.
- Publish your flow.
Next, create your customer flow that will handle customer requested calls.
- Create a new flow, selecting Customer as the type. The flow name should indicate the purpose of this flow, such as Customer Requested Calls.
- Design your flow as you would with Click to Dial notations, replacing Click to Dial with the Request a Call reusable flow that you created for any branch(es) that you want to configure with the queue variable. The reusable flow appears as a notation in your flow designer under the Reusable Flows section of the palette.
You can use a combination of both your reusable flow and Click to Dial notations to achieve your desired flow design configuration.
If you don't already have or need a specific dispatch mapping for a Click to Dial function, you can either create a standard Click to Dial dispatch mapping with an Outbound direction or use one of the methods below.
You can use your existing Click to Dial dispatch mapping if your customer requested calls can route through the same flow and contact point as your agent initiated Click to Dial calls. If you want to use a different flow or contact point, you need to create a separate dispatch mapping.
To create a new dispatch mapping for customer requested outbound calls using a telephone number as a contact point:
- Go to Flows >Dispatch Mappings.
- Click Create.
- Enter a Name for this dispatch mapping, such as Request a Call.
- Optionally, enter a brief Description for this dispatch mapping.
- Select Voice from the Interaction Type list.
- Select Contact Point from the Mapping list.
- In the Mapping Value field, enter the telephone number to use as the unique identifier for the requests.
- Select the Click to Dial flow that you are using for customer requested calls from the Dispatch to flow menu.
- Click Submit.
To create a new dispatch mapping for customer requested outbound calls using a contact point of anything other than a telephone number, such as a website or a web form page ID, make a POST request to the CxEngage API to create a dispatch mapping.
- tenantID: Enter your tenant UUID
- name: Enter a name for this dispatch mapping, such as Request a Call
- flowId: Enter the UUID of the Click to Dial flow that you are using for customer requested calls
- channelType: voice
- interactionField: contact-point
- value: Enter the origin contact point that you want to use for these requests, such as the website address or web form page ID
